

Indonesia 20 GB
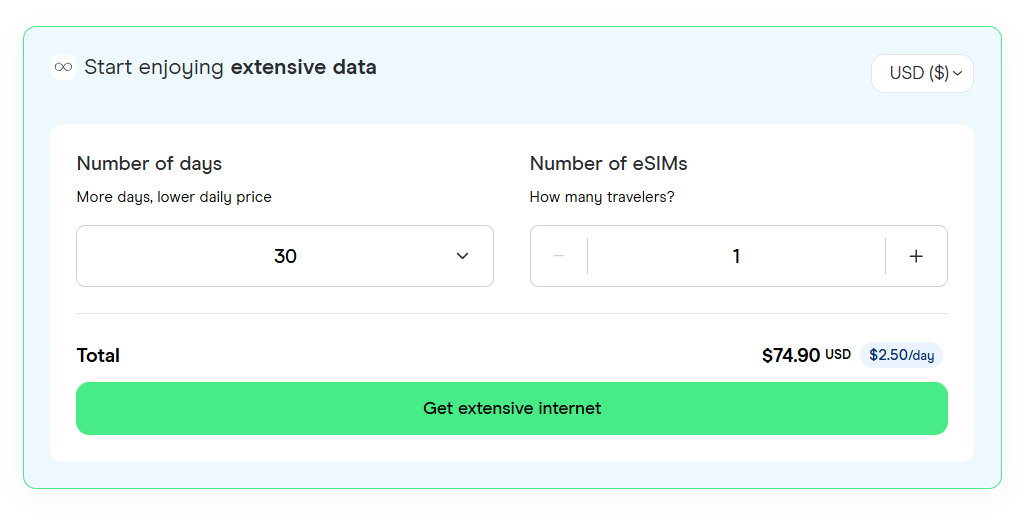
Smartroam
20GB
$34.00
30 Days

According to Wikipedia and ChatGPT, most travellers spend just over a week in Indonesia. But if you’ve ever fallen down a Reddit rabbit hole, you’ll see plenty of people saying even 30 days isn’t enough once you start planning.
With world-famous destinations like Bali, Komodo, Jakarta, and Raja Ampat, it’s easy to see why.
No matter how long you're staying, staying connected is key—whether it's for navigating remote islands, booking last-minute flights, or sharing those unreal beach sunsets on Instagram. That's where eSIMs come in, offering a hassle-free way to ditch the physical SIM card and avoid insane roaming fees.
So, which eSIM is best for Indonesia?
Local providers like Indosat Ooredoo Hutchison (IM3) and Telkomsel offer their own eSIM plan selections, but they require a store visit to get activated. So we rounded up the top international eSIM providers to help you pick the right plan and connect instantly—whether you're here for a week, a month, or contemplating a permanent move after your first Nasi Goreng.
And since many travellers visit Indonesia as part of a longer trip, we’ve included a global plan (Three) to keep you connected wherever you go.
Key Highlights:
Smartroam is a straightforward, reliable option for people visiting Indonesia. Setup is simple: just download the Sim Local app (or scan a QR code) and you're connected to one of the country's best-known networks. Plus, it removes the hassle of swapping SIM cards while keeping your primary number active. Customer support is available by phone, email, online chat, or WhatsApp.
Key Highlights:
Three offers a budget-friendly eSIM option for those who want to stay connected across 70 countries. This 18GB plan for is a solid deal over 30 days, especially if you're traveling beyond Indonesia. Boasting 4G speeds everywhere, activation is quick and painless, requiring only a QR scan or app download. Changed your mind? Get your money back—no questions asked.
.png)
Key Highlights:
Airalo is a popular international eSIM provider and this 20GB-for-$40 plan isn’t the cheapest, but it’s reliable according to most online reviews. If convenience is a priority and you don't mind slightly higher rates, Airalo is one of the better options out there.
Key Highlights:
Holafly is another popular option, boasting unlimited data and extensive coverage. Just make sure you check their reviews and fair usage policy, as speeds can get throttled once you reach a daily threshold. And it’s pricier than other eSIMs on this list—a 30-day plan costs $75.
Timing is everything! Ideally, you should activate your eSIM just before you leave or as soon as you land in Indonesia. Most eSIMs start counting from the moment they connect to a network, so activating too early might waste precious days. No one wants to lose data before they even hit the beach!
Activating an eSIM is as easy as scanning a QR code or downloading an app—literally. Once you purchase your eSIM, you’ll receive instructions and (maybe) a QR code. Then you'll be guided through a few changes in your phone settings. Follow the prompts and (BOOM!) you’re connected—no fumbling with tiny SIM trays or losing your physical SIM in the airport lounge.
Before you dive into the eSIM life, double-check that your phone actually supports eSIMs. Most newer iPhones (XR and later) and high-end Androids (Samsung S20+, Google Pixel 4, etc.) are good to go. If you're rocking an older or budget phone, a quick Google search (or checking in Settings > About Phone) will tell you if your device is eSIM-ready. If not… well, maybe it’s time for an upgrade? Check this list of compatible models if you're not sure.
Please note: These images are for illustrative purposes only and do not belong to us. All rights remain with their respective owners.
 A First-Timer’s Guide to Immigrating to the UK
Whether you're moving from India, China, Pakistan, or the USA there's a few things to know before booking a flight...
 What Is an eSIM UK? Your Guide to Cheaper, Smarter Travel Data
Discover what a UK eSIM is, how it works and why it’s a smarter way to stay connected. This guide breaks down everything travellers need to know with no jargon, just real info and instant solutions from Sim Local.
 Best eSIMs for Travel in Europe (2025)
Our top 6 eSIMs for travel in Europe. And other things to consider...

